Fathom installation on a Ubuntu Server running NginX
As we got closer to opening up TunePad to more classrooms, we wanted to have some web analytics set up. While Google Analytics is almost the default choice in such a scenario, we were looking for alternatives. Fathom seemed promising.
This guide documents the installation and deployment process. It draws heavily from Fathom’s own excellent documentation, but hopefully, the screenshots and slightly more detailed notes would come handy for someone.
Download and Install Fathom
Before using the wget command below to download the file, go to this link to find the most recent release of Fathom for Ubuntu. In our case, we used version 1.2.1. Thereafter, unzip it /usr/local/bin and then add execute permission to it.
wget https://github.com/usefathom/fathom/releases/download/v1.2.1/fathom_1.2.1_linux_386.tar.gz
sudo tar -C /usr/local/bin -xzf fathom_1.2.1_linux_386.tar.gz
sudo chmod +x /usr/local/bin/fathom
Run “fathom –version” to check if the installation was successful.
Basic configuration
Somewhere on the server create a directory where you'd like the analytics package to be installed.
sudo mkdir fathom-analytics
sudo chown sadmin:www-data fathom-analytics/
Then, create a fathom environment config file (filename being "env" in this case), and add the config options to it.
vi .envFATHOM_SERVER_ADDR=9000
FATHOM_GZIP=true
FATHOM_DEBUG=true
FATHOM_DATABASE_DRIVER="postgres"
FATHOM_DATABASE_USER="tunepad"
FATHOM_DATABASE_PASSWORD=“XXXXXXX”
FATHOM_DATABASE_NAME=“fathom"
FATHOM_SECRET=“XXXXXXXXXXX”Now, cd into the “fathom-analytics” directory (or whichever directory you created in above), and run:
fathom serverNow, you should see something similar to the log/output in this screenshot.

Go to http://<your_domain>:9000 (for now, make sure you are not trying to use https). If this is not working, try changing the firewall settings.
sudo ufw allow 9000
sudo ufw status
Then, add a fathom user/username. This username and password will be used to log in to the analytics dashboard.
fathom user add --email="user@yourdomain.com>" --password="XXXXXXXXX" To start fathom on boot, we have to add it as a service. Create a *.service file, add the configuration llowing options to it, and finally reload and restart the service.
# create the *.services file
sudo vim /etc/systemd/system/fathom-analytics.service

# in the services file, paste the contents below
# note the "WorkingDirectory" key, and ensure that you assign the path
# where you installed/downloaded the fathom instance.
[Unit]
Description=Starts the fathom server
Requires=network.target
After=network.target

[Service]
Type=simple
User=sadmin
Restart=always
RestartSec=3
WorkingDirectory=/srv/projects/fathom-analytics
ExecStart=/usr/local/bin/fathom server

[Install]
WantedBy=multi-user.target

#then reload and start the service
sudo systemctl daemon-reload
sudo systemctl enable fathom-analytics
sudo systemctl start fathom-analytics
Since we have HTTPS on our domains, we needed to do a couple of more steps
Using NGINX with Fathom
Add fathom to sites-enabled for NginX, start by creating the file
sudo vim/etc/nginx/sites-enabled/fathomthen, adding the following to it (again, ensure that you have the correct paths and server addresses based on your own server/fathom instance that you are setting up). We had tunepad.codes as the domain in this case.
server {
	server_name tunepad.codes www.tunepad.codes;

	location / {
		proxy_set_header X-Real-IP $remote_addr;
		proxy_set_header X-Forwarded-For $remote_addr;
		proxy_set_header Host $host;
		proxy_pass http://127.0.0.1:9000;
	}
}
This is what what the directory structure looks like on our server

This is the fathom service file (Certbot added the https stuff, we cover that later):

Test NGINX configuration
sudo nginx -t (#to test NGINX configuration)Reload NGINX configuration after adding symlink to sites-enabled
Reload NGINX configuration after adding symlink to sites-enabledCertbot Setup for SSL
Make sure that for the domain used for Certbot has the Name and A-records set correctly (tunepad.codes, our server, looks like this on Namecheap).

Then, on the server, run Certbot.
certbot --nginx -d tunepad.codesOnce this is done, try going to the domain (tunepad.codes in this case) and logging in with the credentials set using Fathom’s add-user command.
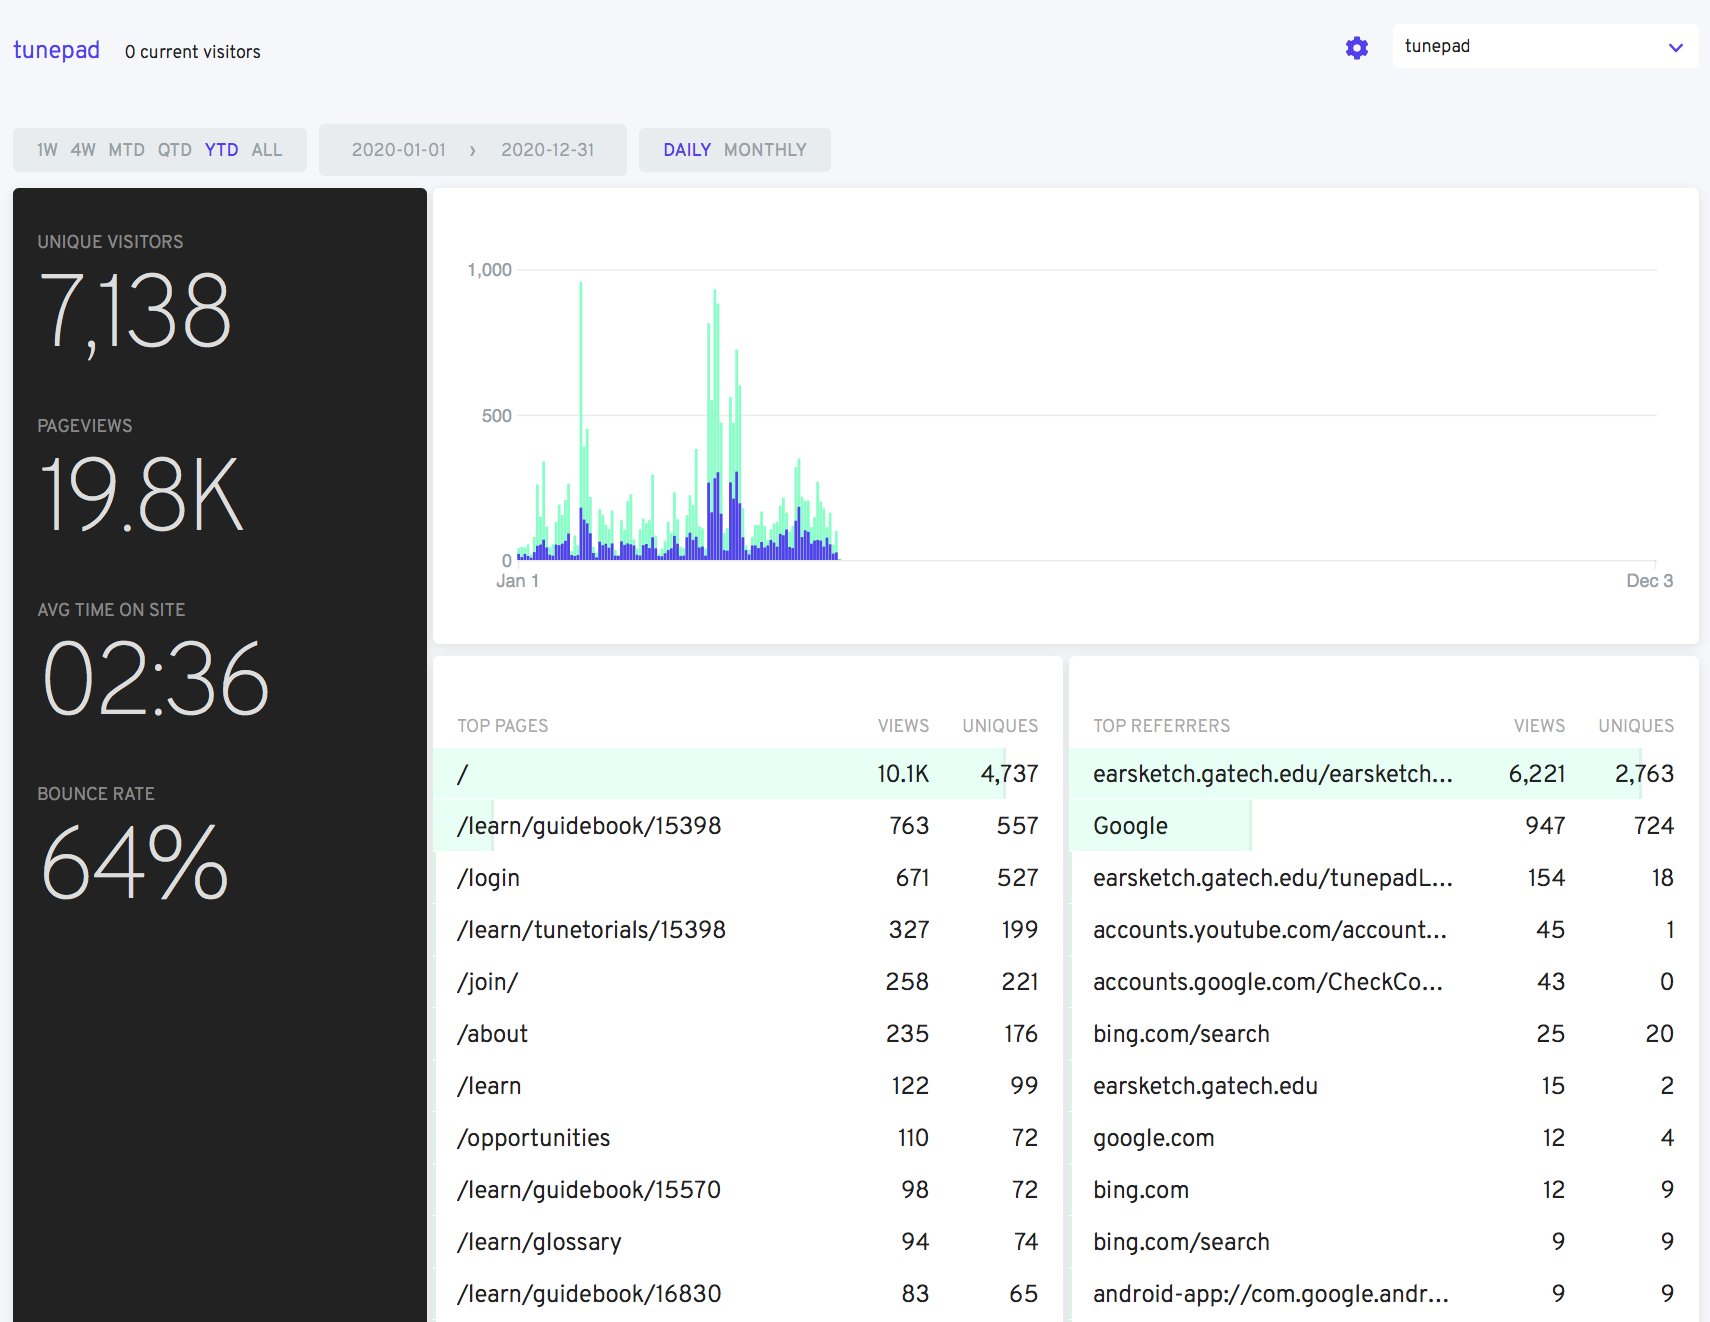
Copy the Tracking snippet from the Fathom dashboard and add it to the pages that need to be tracked. If something went wrong, try going through the steps listed here: Fathom Github.
If all went well, you can now go to your domain with the fathom installation mapped to it.