More front-end repairs on the Acura Legend
Changing the CV-axle, upper-control arms, and stabilizer bar links.
While changing the rotors and brake pads, I had noticed that the rubber boot on the driver’s side CV-axle was broken. That side had been feeling a little “loose” when the wheel went over an expansion joint or a bump on the road. With the car getting old, and the right side having undergone repairs last year (CV-axle + upper control arm + tie-rod end), I was not surprised that a similar repair would be due on the driver’s side.
The repair turned out to be a bigger endeavour than it should have been, and taught me a lesson. I had planned the initial repair to just be a CV-axle replacement, but as things turned out, there were a lot more parts that needed replacement.
Cost of Repair
- Parts ($91.21)
- CV-axle ($27.34)
- Upper Control Arm ($38.09)
- Stabilizer Bar link + bushings, both sides ($16.78)
- Lower ball joint ($9)
- Tools ($46.37)
- Wheel Chocks ($10.59)
- 36mm Axle Nut Socket ($9.99)
- Breaker Bar ($15.28) & Plumbing pipe ($10.51) for extra leverage
- Consumables ($15.52)
- Brake parts cleaner ($4.29)
- Penetrating fluid: Liquid Wrench ($3.97) & PB B’laster ($3.76)
- Work gloves ($3.50)
- Workshop costs ($171.61)
- Broken bolt removal at Shawnee Service Center ($113.61)
- Lower ball joint removal + pressing in new one at Midas Orland Park ($58)
Total: $324.71 (a similar repair on the right side without the stabilizer bar repair cost $530 at year ago). While that equates to a $200+ saving, contrary to the brake repairs I’d done earlier, the time invested and the hassle has been tough to rationalize. In the hypothetical scenario where the repair went according to plan, the total amount would have been slashed in half ($324.71 - $171.61 = $153.10).
First things first, before getting the car on the jack, I had to loosen the axle nut. Easier said than done. After failing to take it off using an axle nut socket and breaker bar, it was time for a quick trip to the hardware store to purchase a longer pipe for more leverage. Sized to move a mountain, the pipe made short work of the axle nut.

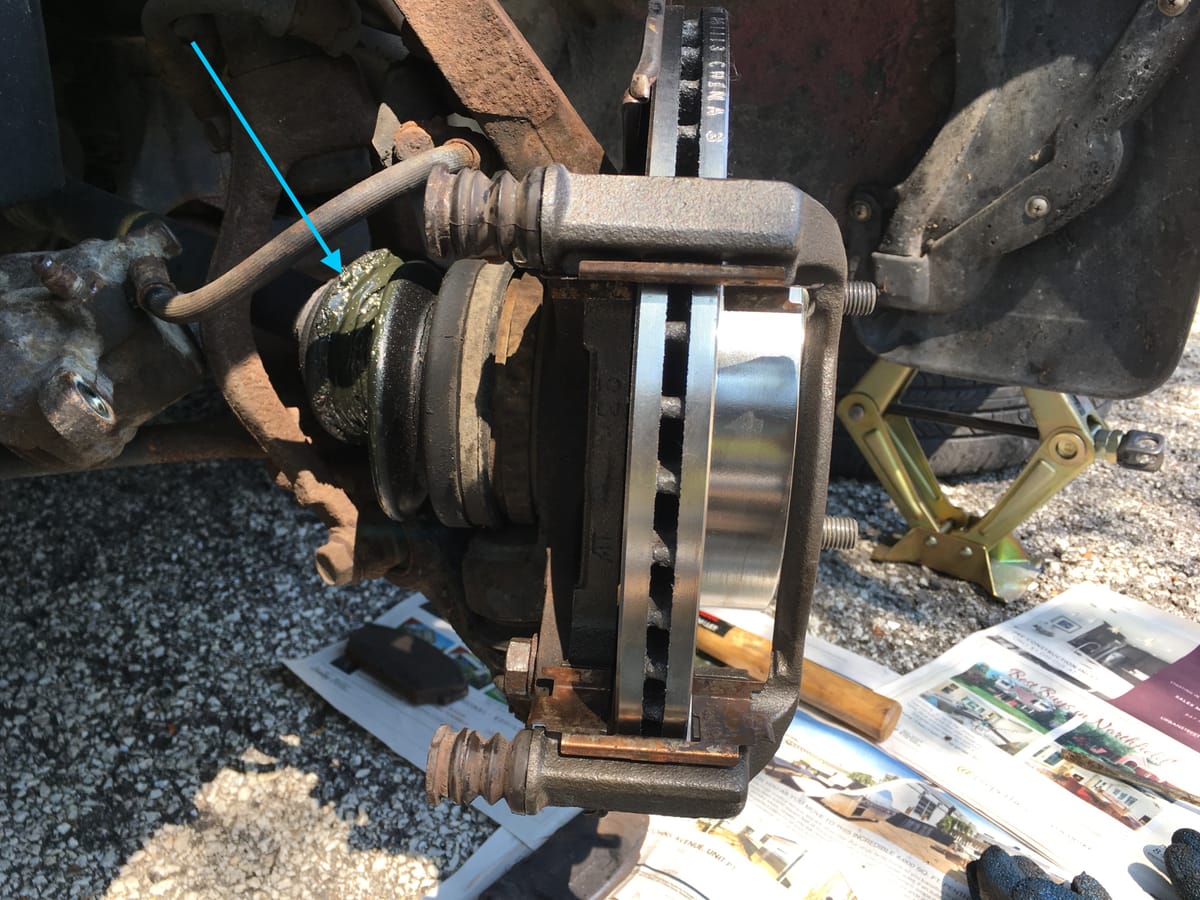
Next, I had to remove the two bolts on the V-fork that connected to the shock absorber on the top, and the lower control arm on the bottom (highlighted using blue circles below). Before attempting to undo these, I had liberally sprayed penetrating fluid and let things rest for a half hour.

The bolt through the lower control arm came off easily enough.

Unfortunately, this is where this repair exercise went pear-shaped. The upper bolt on the V-fork mount sheared off. Honda/Acura – for some reason – had decided not to use a normal bolt and a nut (with some sort of a locking mechanism, e.g. a castle nut with a cotter pin, or a nut with a split lock washer), but instead had used a pinch bolt that was screwed onto a thread that was cut on the inside of the V-fork bracket. Result: I had nothing to grab onto on the other side of this bolt that had sheared off.


Luckily for me, the car was parked in a garage that Nicole had recently started renting (at the time, she’d had it for just a couple of days!). I gave up on the repair for the time being to think about what, if any, steps could be taken to fix this. I reassembled the car and took it out of the garage and slowly drove the car back to my place (forums mentioned that the rusty bolt should hold for a while, I know, sketchy).
After a week or so, I had a plan. The plan was to disassemble the entire spring+strut assembly with the v-fork bracket on it, and then take it to a machine shop or a car workshop that might agree to help out.
So, to start, the knuckle had to be taken out. That meant trying to remove the lower ball-joint. The ball-joint uses a tapered fit to connect to the lower control arm. And it was well and truly stuck. I was using a pickle fork to try and pry it out, and I learned the hard way that it ruins the rubber boot that keeps the joint lubricated with grease. Later on, I rented a 2 Ton puller from Oreilly, and that did the trick.


Next, I used a Pitman arm puller (rental) to take out the tie-rod end.

Aha! The knuckle was out of the way of the CV-axle.

Then, I removed the three nuts holding down the strut assembly to the strut tower near the firewall. With the brake hose routers undone and a bungee cord keeping the brake hose out of the way, only one more thing was in the way, the upper control arm (highlighted in blue).

By now, the CV-axle was already out. This created room to “drop” the spring+strut assembly and remove it.

This is the transmission side of the CV-axle, and you see a transmission seal here too. Interestingly, I lost a little bit of transmission fluid (which in this case was simply 10W-30 engine oil). That surprised me because the service manual said that the driver’s side wouldn’t lose oil. As it turns out, my service manual was for a right-hand drive car, and they had implied that removing the CV-shaft on the right side would not lead to any loss of transmission fluid.

New vs. Old CV-axle.

Here’s the view with the knuckle and the strut assembly taken out.

The next step took about 9 days. Mostly because I was given a runaround by one repair shop in Orland Park that falsely promised to help me and then reneged on that offer. The car was stuck in the garage, and I decided to take the strut assembly back to Wilmette with me hoping that a machine shop in Evanston/Wilmette would help out. As luck would have it, Shawnee Service Center just a block from my apartment very kindly agreed to take on the job. They later said that it took some doing (lots of heat + an impact hammer), but they were successful. As you see in the photo below, they cleaned up the whole part and installed a new bolt too. Things were looking up :).

Well, while all the trouble with the broken bolt was being sorted out, I had ordered and received an upper control arm to replace the one on the car. Both the ball joint and the rubber bushings on the part mounted near the frame were toast.

Here you see the busted ball joint.

Old one out, new one in!

By the way, I had forgotten to tighten the bolt on the swivel portion of the control arm (the one with the ratchet on it) because keeping it loose initially helps while installing the knuckle. Just something to keep in mind if you find yourself doing a similar repair.

The driveshaft/CV-axle replacement was a piece of cake because I had a lot of room to work with (you see the pickle fork on the bottom left of the photo. That had damaged the lower ball joint, but it came super handy as a pry bar).

I had to take the knuckle to a repair shop to take out the lower ball joint. Even though I was able to rent a C-clamp press that is used to remove ball joints, I did not have a desk/vice grip to hold the knuckle in place.

This is the knuckle with the new ball joint (installed by Midas in Orland Park).

By the way, I added a split washer and some thread locker blue (leftover from the brake job earlier) to the new nut+bolt of the V-fork bracket.

A view of car with the new CV-axle, the spring+ strut assembly, and the new upper-control arm in place.

Home stretch, just the rotor and the calipers left to be mounted :).

After all of that, the car has been running quite well and has clocked close to 425 miles as of writing this report. This was a doozy, but I learnt a valuable lesson. On a 30 year old car that has chugged along on snow + copious amounts of salt, it is better to assume that rust could be the bane of a repair job. I try to undo all fasteners very carefully, and try to weigh in the worst case scenario before getting into the weeds (e.g. as alluded to earlier I might undertake a brake hose replacement job soon, but I have already made sure that I can undo all the necessary fasteners easily).
On a side note, since the stabilizer bar links + bushing were very worn out (and broken on one side, I replaced them as well the weekend after the CV-axle job was finished). Some photos of that 30-minute job below.